Hugo + GitHub Pagesでこのブログを運用していて、以下の要件を目指しました。
- お金をかけないこと
- Markdownで記事を書けること
- ブログの静的データのみ公開し、元ネタは公開しないこと
- 記事の更新/反映が自動化されていること
似たような要件でブログを作ってみたい人に向けて、構築の流れを紹介したいと思います。 初心者向けに細かく説明しているので若干長いと思います。
以下にリンク付き目次を載せておくので、 興味があるトピックだけつまみ食いしてもらう読み方のほうが良いかもしれません。
お金をかけないこと
GitHub Pages用のRepositoryを用意する
GitHub Pagesを使いましょう。
GitHub Pagesとは、Github社が提供しているホスティングサービスで、 Githubのリポジトリにhtml, css, jsを置くとそれをそれらをウェブサイトとして公開、ホスティングしてくれます(無料!!)。
設定方法などはたくさん記事がありますが、 2020/10現在の最新の手順として、ここでも改めて具体的な流れを説明することにします。
最初に、Githubアカウントがなければ作りましょう。 GitHub Free プランはその名の通り無料です。
アカウントができたら、ブログ本体のリポジトリを作りましょう。 my-blog とかなんでも良いです。
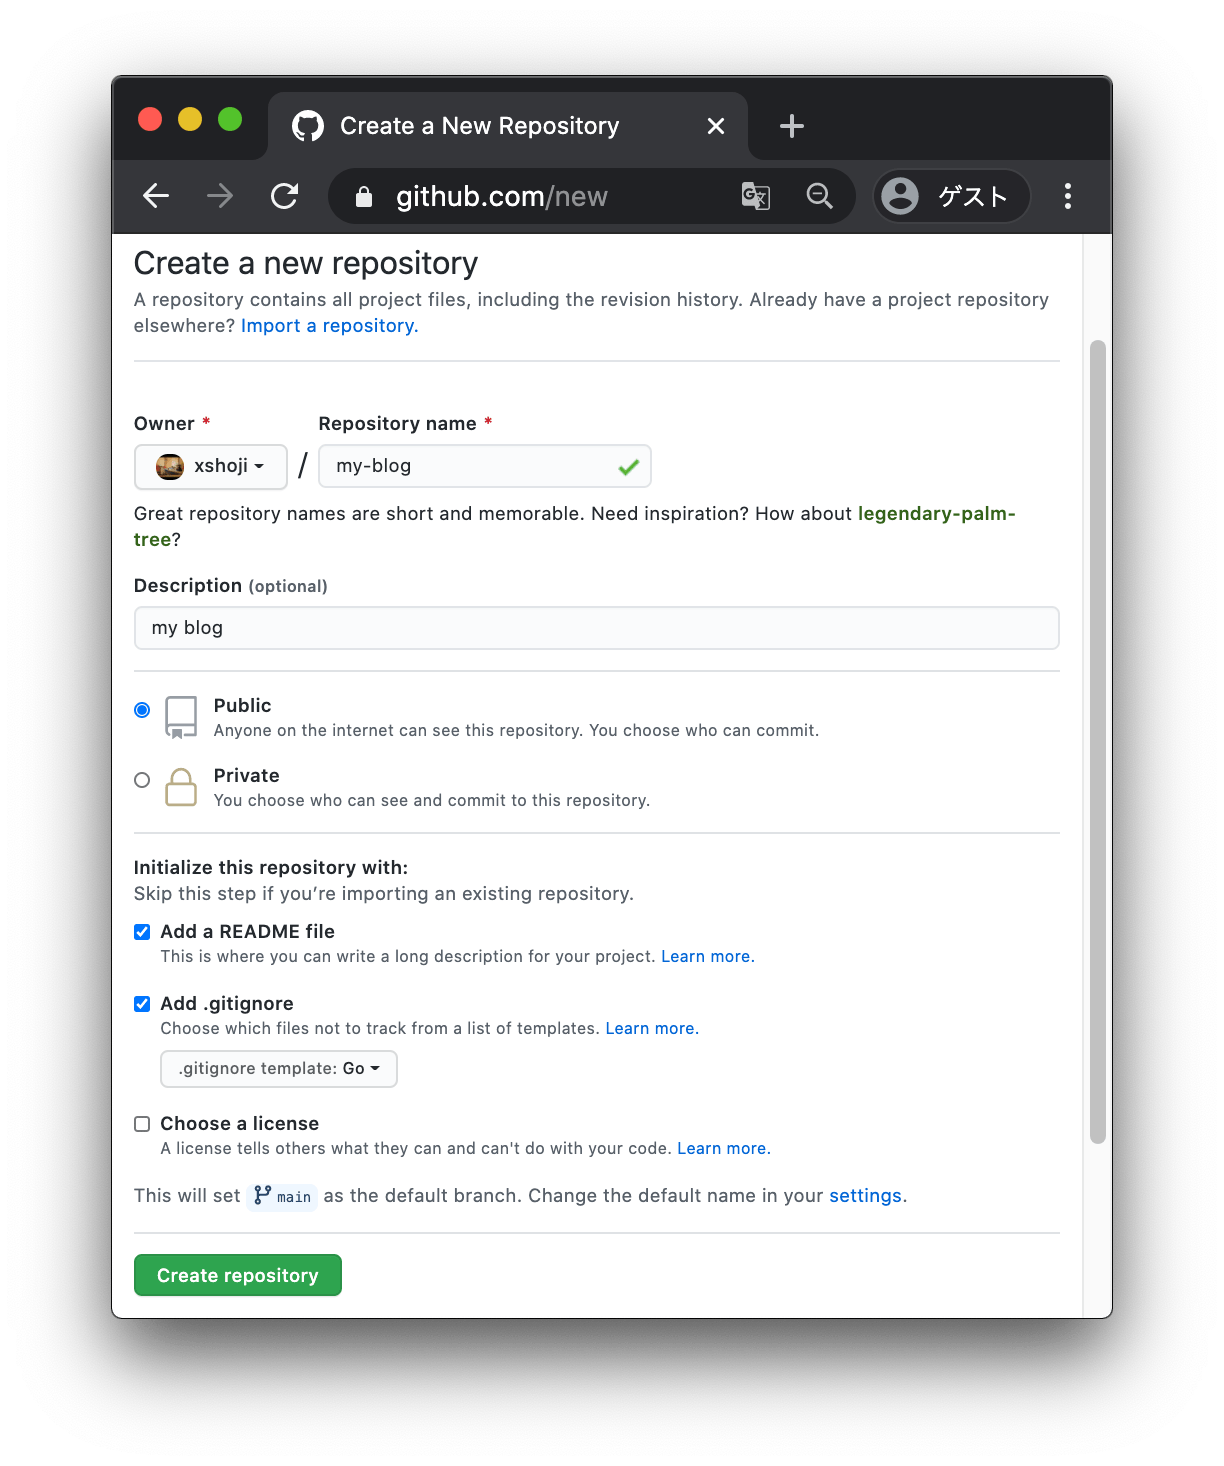
↑の通り、ここで作成するリポジトリは Public repository で作成してください。
GitHub Free プランでは、Private repositoryをGitHub Pagesとして公開することはできません。
GitHub Pages について - GitHub Docs
https://docs.github.com/ja/free-pro-team@latest/github/working-with-github-pages/about-github-pagesGitHub Pagesは、GitHub Free 及びGitHub FreeのOrganizationではパブリックリポジトリでのみ使用でき…
※2020/10現在の情報
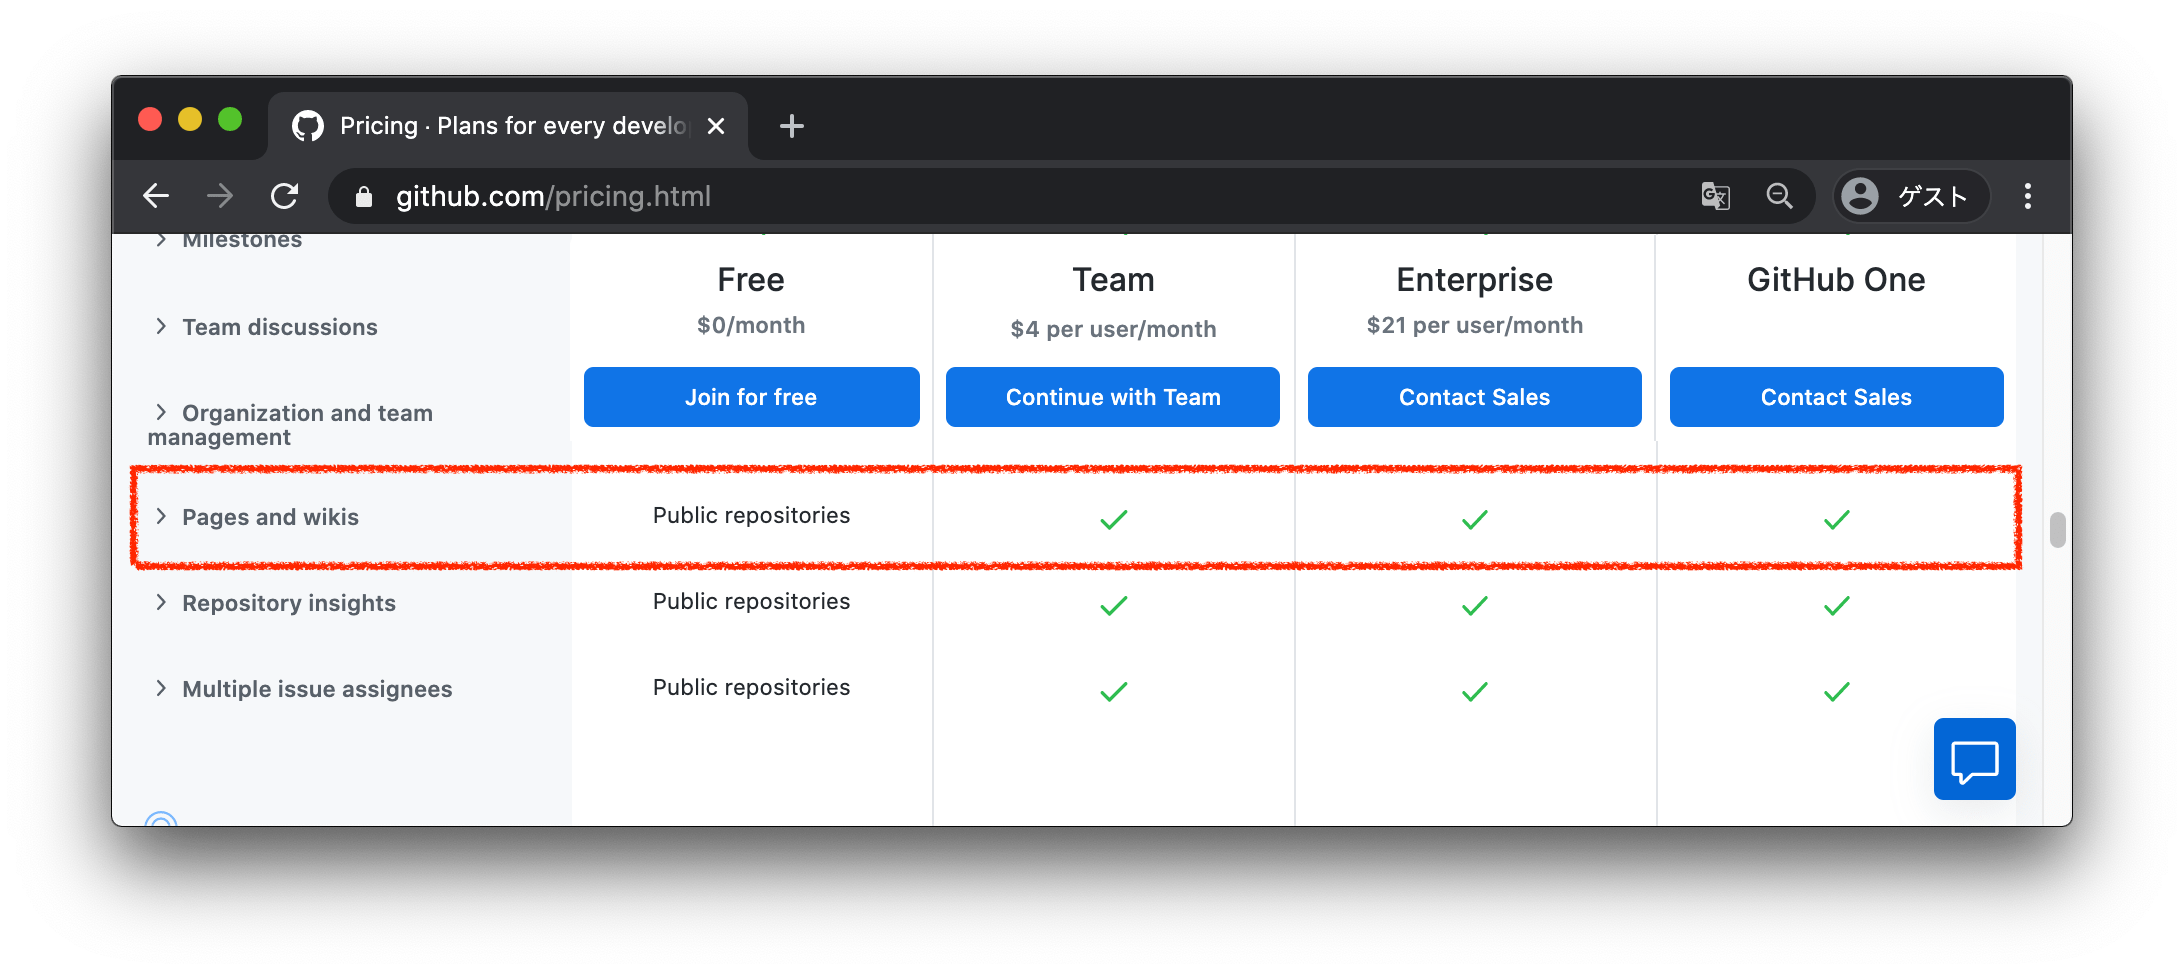
ググると、たまにブログでPrivate repositoryでもGitHub Pagesで公開できるみたいなこと書いてある場合がありますが、
それは Github Team のプランなど、課金している場合だけです。
お金をかけたくない場合 GitHub Free になるので、おとなしくPublic repositoryを使いましょう。
※ただし、このあと説明する方法により、ブログの元素材はPrivate repositoryで管理することができます👌
GitHub Pagesを設定して公開する
作成できたら、このリポジトリをGitHub Pagesで公開する設定を行います。
リポジトリページの右上の「Settings」から「GitHub Pages」の「Source」項目を
ブランチを main に、/docs をsourceディレクトリに指定してSaveします。
(2020-10-05から、デフォルトブランチが main になったようです。前は master でした。なので、 masterになってる人はmasterでもOKです。)

完了したら、以下の内容のhtmlファイルをリポジトリの docs/index.html というパスに作成します。
<!DOCTYPE html>
<html>
  <head>
    <meta charset="UTF-8">
    <title>Welcome to My GitHub Pages</title>
  </head>

  <body>
    <main>
      <h1>Welcome to My GitHub Pages</h1>
    </main>
  </body>
</html>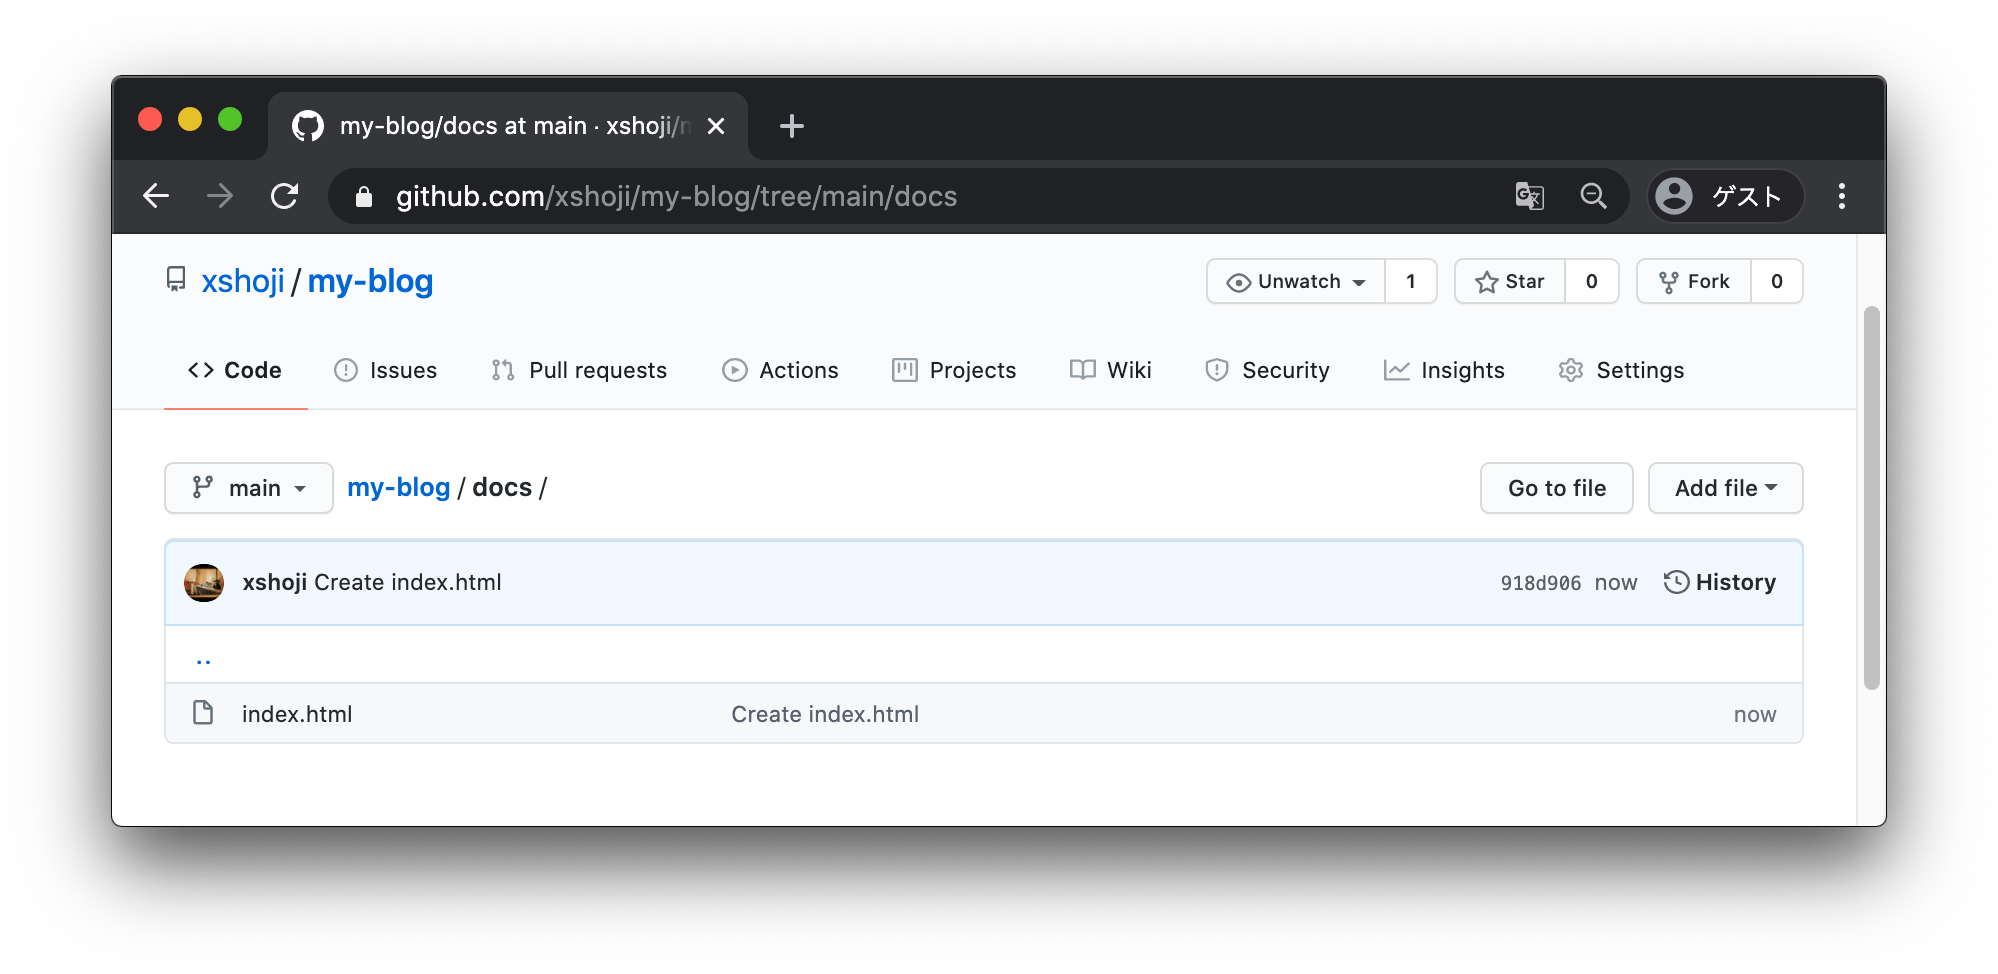
では早速作ったページにアクセスしてみます。先程と同じく、リポジトリページの右上の「Settings」から「GitHub Pages」へ行くと 自分のリポジトリのGitHub PagesのURLが表示されていると思うので、開いてみてください。
Your site is published at https://xshoji.github.io/my-blog/
↑みたいな感じで出てるはず。 Welcome to My GitHub Pages と表示されていたらOKです。
これでGitHub Pagesの設定は完了です。
Markdownで記事を書けること
Hugoを導入する
Github Pagesに載せる記事を書く仕組みを作ります。
What is Hugo | Hugo
https://gohugo.io/about/what-is-hugo/
Hugoとは、Goで書かれた静的サイトジェネレーターです。
まぁ、Markdownで書いた記事をhtmlに変換してくれるツール、と思ってもらってOKです。 WordPressからHugoに乗り換えるひとも多いみたいで、ここ数年流行ってるのでこれを使います。 (使ってみて、実際簡単で使いやすかったです。)
まず、hugoをローカルPCにインストールします。Macの場合はbrewで入れれます。
$ brew install hugo

$ hugo version
Hugo Static Site Generator v0.75.1/extended darwin/amd64 BuildDate: unknown
インストールしたら、次はHugo用のリポジトリを作りましょう。
Hugo用のリポジトリを作る
Hugo用のリポジトリを作りましょう。 my-blog-source とかなんでも良いです。
ここで作成するリポジトリは Private repository でOKです。
このリポジトリは記事の元ネタを管理するリポジトリになるので外部には公開されません。
Hugoでサイトの雛形を作る
↑で作ったリポジトリをcloneし、その中にblogの記事の元ネタとなるファイル群を生成しましょう。
#------------------------------------------
# git cloneする
#------------------------------------------
$ git clone https://github.com/xshoji/my-blog-source
Cloning into 'my-blog-source'...
remote: Enumerating objects: 4, done.
remote: Counting objects: 100% (4/4), done.
remote: Compressing objects: 100% (3/3), done.
remote: Total 4 (delta 0), reused 0 (delta 0), pack-reused 0
Unpacking objects: 100% (4/4), 854 bytes | 213.00 KiB/s, done.
$


#------------------------------------------
# サイトの雛形を作る
#------------------------------------------
$ cd my-blog-source/
$ hugo new site hugo-source
Congratulations! Your new Hugo site is created in /tmp/my-blog-source/hugo-source.

Just a few more steps and you\'re ready to go:

1. Download a theme into the same-named folder.
   Choose a theme from https://themes.gohugo.io/ or
   create your own with the "hugo new theme <THEMENAME>" command.
2. Perhaps you want to add some content. You can add single files
   with "hugo new <SECTIONNAME>/<FILENAME>.<FORMAT>".
3. Start the built-in live server via "hugo server".

Visit https://gohugo.io/ for quickstart guide and full documentation.
$ ls -al
total 16
drwxr-xr-x   6 user  wheel  192 10  5 04:49 .
drwxrwxrwt   6 root  wheel  192 10  5 04:40 ..
drwxr-xr-x  12 user  wheel  384 10  5 04:40 .git
-rw-r--r--   1 user  wheel  269 10  5 04:40 .gitignore
-rw-r--r--   1 user  wheel   42 10  5 04:40 README.md
drwxr-xr-x   9 user  wheel  288 10  5 04:49 hugo-source
$


#------------------------------------------
# サイトのデザインテンプレートを設定する
#------------------------------------------
# https://themes.gohugo.io/ から自分の好きなテンプレートを選び、「Homepage」からGithubのリポジトリページに行きます。
# 今回の例では、
# https://themes.gohugo.io/hugo-theme-simple-blog/ | Hugo Theme Simple Blog
# を使いました。
$ ls -al
total 16
drwxr-xr-x   6 user  wheel  192 10  5 04:49 .
drwxrwxrwt   6 root  wheel  192 10  5 04:40 ..
drwxr-xr-x  12 user  wheel  384 10  5 04:40 .git
-rw-r--r--   1 user  wheel  269 10  5 04:40 .gitignore
-rw-r--r--   1 user  wheel   42 10  5 04:40 README.md
drwxr-xr-x   9 user  wheel  288 10  5 04:49 hugo-source
$
$ git submodule add https://github.com/10mohi6/hugo-theme-simple-blog hugo-source/themes/simple-blog
Cloning into '/private/tmp/my-blog-source/hugo-source/themes/simple-blog'...
remote: Enumerating objects: 73, done.
remote: Counting objects: 100% (73/73), done.
remote: Compressing objects: 100% (48/48), done.
remote: Total 73 (delta 22), reused 69 (delta 18), pack-reused 0
Unpacking objects: 100% (73/73), 919.49 KiB | 1.10 MiB/s, done.
$ git submodule update --init --recursive
$


#------------------------------------------
# サイトの基本設定を行う
#------------------------------------------
# まず、空Directoryを保持するために.gitkeep配置
$ touch hugo-source/data/.gitkeep
$ touch hugo-source/layouts/.gitkeep
$ touch hugo-source/static/.gitkeep

# 次に、コンフィグファイルをいじる
$ vim hugo-source/config.toml
$ cat hugo-source/config.toml
# baseURL: 自分のGithub PagesのURLを設定します。
baseURL = "https://xshoji.github.io/my-blog/"
# languageCode: 言語を設定します。今回は日本語なのでjaを指定。
languageCode = "ja"
# title: ブログのタイトルを設定します。
title = "my-blog"
# theme: 自分の選んだテーマ名を設定します。
theme = "simple-blog"
Hugoで記事を作ってローカルで確認する
さっそくMarkdownで記事を書いてみましょう。
#------------------------------------------
# 記事を作る
#------------------------------------------
$ ls -al
total 24
drwxr-xr-x   7 user  wheel  224 10  5 05:05 .
drwxrwxrwt   6 root  wheel  192 10  5 05:01 ..
drwxr-xr-x  13 user  wheel  416 10  5 05:05 .git
-rw-r--r--   1 user  wheel  269 10  5 04:40 .gitignore
-rw-r--r--   1 user  wheel  142 10  5 05:05 .gitmodules
-rw-r--r--   1 user  wheel   42 10  5 04:40 README.md
drwxr-xr-x  11 user  wheel  352 10  5 05:00 hugo-source

# まず、hugo-sourceに移動してから
$ cd hugo-source/

# postを作成します。
$ hugo new posts/20201005_first-post.md
/tmp/my-blog-source/hugo-source/content/posts/20201005_first-post.md created
$ vim content/posts/20201005_first-post.md
$ cat content/posts/20201005_first-post.md
---
title: "20201005_first Post"
date: 2020-10-05T04:51:46+09:00
draft: true
---

# First post

This is my first post.

$
記事が書けたら、ローカルでサイトを立ち上げ、ブログのイメージを確認できます。
$ ls -al
total 24
drwxr-xr-x   7 user  wheel  224 10  5 05:05 .
drwxrwxrwt   6 root  wheel  192 10  5 05:01 ..
drwxr-xr-x  13 user  wheel  416 10  5 05:05 .git
-rw-r--r--   1 user  wheel  269 10  5 04:40 .gitignore
-rw-r--r--   1 user  wheel  142 10  5 05:05 .gitmodules
-rw-r--r--   1 user  wheel   42 10  5 04:40 README.md
drwxr-xr-x  11 user  wheel  352 10  5 05:00 hugo-source
$ cd hugo-source
$ hugo server -D
Start building sites …

                   | EN
-------------------+-----
  Pages            | 10
  Paginator pages  |  0
  Non-page files   |  0
  Static files     |  2
  Processed images |  0
  Aliases          |  4
  Sitemaps         |  1
  Cleaned          |  0

Built in 3 ms
Watching for changes in /tmp/my-blog-source/hugo-source/{archetypes,content,data,layouts,static,themes}
Watching for config changes in /tmp/my-blog-source/hugo-source/config.toml
Environment: "development"
Serving pages from memory
Running in Fast Render Mode. For full rebuilds on change: hugo server --disableFastRender
Web Server is available at http://localhost:1313/my-blog/ (bind address 127.0.0.1)
Press Ctrl+C to stop
Web Server is available at http://localhost:1313/my-blog/ (bind address 127.0.0.1)
↑のURLにアクセスしてみましょう。
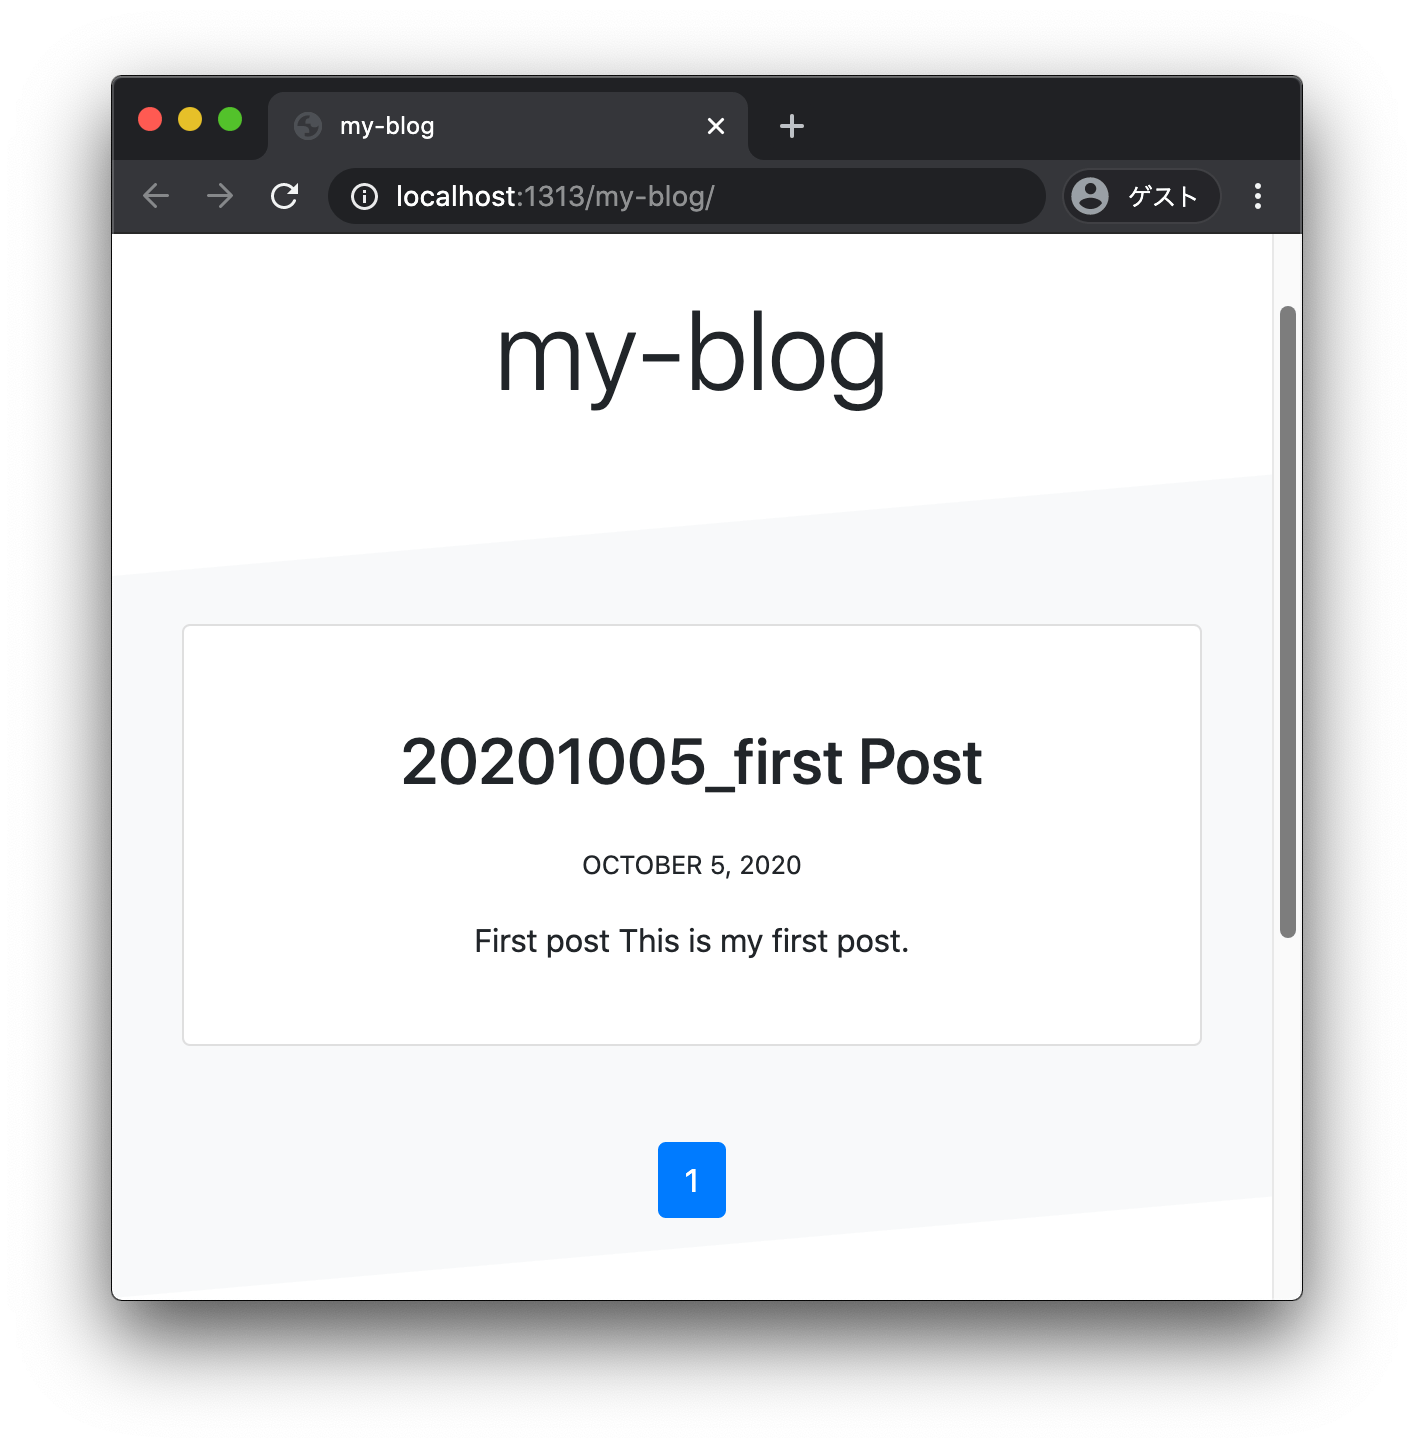
Markdownで書いた記事がブログに反映されました🎉
ブログの静的データのみ公開し、元ネタは公開しないこと
作った記事をGithub Pagesで公開する
記事ができたので、Github Pagesで公開します。
まず、Hugoの設定を少し変更します。
$ ls -al
total 24
drwxr-xr-x   7 user  wheel  224 10  5 05:05 .
drwxrwxrwt   6 root  wheel  192 10  5 05:01 ..
drwxr-xr-x  13 user  wheel  416 10  5 05:05 .git
-rw-r--r--   1 user  wheel  269 10  5 04:40 .gitignore
-rw-r--r--   1 user  wheel  142 10  5 05:05 .gitmodules
-rw-r--r--   1 user  wheel   42 10  5 04:40 README.md
drwxr-xr-x  11 user  wheel  352 10  5 05:00 hugo-source
$ vim hugo-source/config.toml
$ cat hugo-source/config.toml
# baseURL: 自分のGithub PagesのURLを設定します。
baseURL = "https://xshoji.github.io/my-blog/"
# languageCode: 言語を設定します。今回は日本語なのでjaを指定。
languageCode = "ja"
# title: ブログのタイトルを設定します。
title = "my-blog"
# theme: 自分の選んだテーマ名を設定します。
theme = "simple-blog"
# publishDir: 静的サイトの生成先ディレクトリ。"my-blog" 部分は自身のGithub Pagesのリポジトリ名と一致させてください。
publishDir = "../my-blog/docs"
$
publishDir という設定を追加しました。
次に、記事を公開するため、記事のMarkdownファイルの「draft」を「false」に変更します。
$ ls -al
total 24
drwxr-xr-x   7 user  wheel  224 10  5 05:05 .
drwxrwxrwt   6 root  wheel  192 10  5 05:01 ..
drwxr-xr-x  13 user  wheel  416 10  5 05:05 .git
-rw-r--r--   1 user  wheel  269 10  5 04:40 .gitignore
-rw-r--r--   1 user  wheel  142 10  5 05:05 .gitmodules
-rw-r--r--   1 user  wheel   42 10  5 04:40 README.md
drwxr-xr-x  11 user  wheel  352 10  5 05:00 hugo-source
$ vim hugo-source/content/posts/20201005_first-post.md
$ cat hugo-source/content/posts/20201005_first-post.md
---
title: "20201005_first Post"
date: 2020-10-05T04:51:46+09:00
draft: false <---- ここを「false」にします。falseにすることで記事が生成される(=公開される)ようになります。「true」だとドラフト版の状態となりサイト生成時にhtmlが生成されません。
---

# First post

This is my first post.
サイトを生成してみます。
$ ls -al
total 40
drwxr-xr-x   8 user  wheel   256 10  5 05:43 .
drwxrwxrwt   8 root  wheel   256 10  5 05:38 ..
-rw-r--r--@  1 user  wheel  6148 10  5 05:36 .DS_Store
drwxr-xr-x  13 user  wheel   416 10  5 05:05 .git
-rw-r--r--   1 user  wheel   269 10  5 04:40 .gitignore
-rw-r--r--   1 user  wheel   142 10  5 05:05 .gitmodules
-rw-r--r--   1 user  wheel    42 10  5 04:40 README.md
drwxr-xr-x  11 user  wheel   352 10  5 05:00 hugo-source
$ cd hugo-source/
$ hugo --minify --gc --cleanDestinationDir
Start building sites …

                   | EN
-------------------+-----
  Pages            | 10
  Paginator pages  |  0
  Non-page files   |  0
  Static files     |  2
  Processed images |  0
  Aliases          |  4
  Sitemaps         |  1
  Cleaned          |  0

Total in 52 ms
$ cd ..
$ ls -al
total 40
drwxr-xr-x   9 user  wheel   288 10  5 05:44 .
drwxrwxrwt   8 root  wheel   256 10  5 05:38 ..
-rw-r--r--@  1 user  wheel  6148 10  5 05:36 .DS_Store
drwxr-xr-x  13 user  wheel   416 10  5 05:05 .git
-rw-r--r--   1 user  wheel   269 10  5 04:40 .gitignore
-rw-r--r--   1 user  wheel   142 10  5 05:05 .gitmodules
-rw-r--r--   1 user  wheel    42 10  5 04:40 README.md
drwxr-xr-x  11 user  wheel   352 10  5 05:00 hugo-source
drwxr-xr-x   3 user  wheel    96 10  5 05:44 my-blog <------ ディレクトリが生成されてる
ディレクトリが生成されていると思います。 このディレクトリの中に、Github Pages公開用の静的ファイルがされています。 中身を覗いてみましょう。
$ cd my-blog/
$ ls -al
total 0
drwxr-xr-x   3 user  wheel   96 10  5 05:44 .
drwxr-xr-x   9 user  wheel  288 10  5 05:44 ..
drwxr-xr-x  11 user  wheel  352 10  5 05:44 docs
$ cd docs/
$ ls -al
total 32
drwxr-xr-x  11 user  wheel   352 10  5 05:44 .
drwxr-xr-x   3 user  wheel    96 10  5 05:44 ..
-rw-r--r--   1 user  wheel  1660 10  5 05:44 404.html
drwxr-xr-x   5 user  wheel   160 10  5 05:44 categories
drwxr-xr-x   4 user  wheel   128 10  5 05:05 css
-rw-r--r--   1 user  wheel  2086 10  5 05:44 index.html
-rw-r--r--   1 user  wheel   754 10  5 05:44 index.xml
drwxr-xr-x   3 user  wheel    96 10  5 05:44 page
drwxr-xr-x   6 user  wheel   192 10  5 05:44 posts
-rw-r--r--   1 user  wheel   582 10  5 05:44 sitemap.xml
drwxr-xr-x   5 user  wheel   160 10  5 05:44 tags
$
この「docsディレクトリ」がGithub Pages公開用のファイル群となります。
なので、これらのファイルを一番初めに作成したブログ本体のリポジトリ( my-blog )に追加してコミット、プッシュしましょう。
#------------------------------------------
# ブログ本体のリポジトリ( `my-blog` )をcloneする
#------------------------------------------
$ cd /tmp/
$ git clone https://github.com/xshoji/my-blog

#------------------------------------------
# Hugoで生成したファイル群を追加してコミット、プッシュする
#------------------------------------------
$ cd my-blog
$ rm -rf docs
$ cp -R ../my-blog-source/my-blog/docs .
$ git add .
$ git commit -am "Add files"
$ git push origin main
プッシュすると、Github Pagesが更新されます。 GitHub Pagesを設定して公開する で公開したページを見てみましょう。
先程ローカルで確認したブログ記事が公開されているでしょうか。 これで、記事の元ネタのMarkdownは公開せず(Private repository)、 最終的に生成されるhtmlファイルのみ公開されている(Public repository)状態を作れました。
何が嬉しいのかというと、
- 自分専用のコメントを書ける(コメント行はhtmlに出力されない)
- 公開前の記事がどこにも晒されない
- 記事の元ネタとなる公開したくないデータなどを一元管理できる
などのメリットがあります。
.gitignoreを整理する
ここまできたら、あとは
- Markdownの記事を追加する
- ローカルで確認する
- サイトを生成する
- ブログ本体のリポジトリ(
my-blog)に反映して公開する
という流れでサイトを運営できます。
が、運用を始める前に、Hugo用リポジトリでいくつかコミット対象外にしておいたほうが良いディレクトリがあるので .gitignore に追加しておきましょう。
cat .gitignore
### Mac ###
.DS_Store

### IntelliJ IDEA ###
.idea
*.iws
*.iml
*.ipr

### Hugo ###
my-blog <--- こいつを追加
my-blog を無視しているのはHugoで生成されるディレクトリだから、という理由もあるんですが、
もう一つ、このあとに説明するGithub Actionで更新を自動化する際にこの.gitignoreの設定が必要になります。
記事の更新/反映が自動化されていること
さて、ここまでで無料でブログを運用する構成にはできたんですが、
ブログを更新するたびに、↑の作業をするのは流石にめんどくさすぎるので、
ブログの元ネタのリポジトリ( my-blog-source )を更新するだけで、
ブログ本体の静的ファイルの生成と公開を自動的に行う方法をご紹介します。
Github Actionsで公開作業を自動化する(概要)
Github Actionsでどのように自動化するのか、概要を説明します。
                    + - - - - - - - - - - - - - +         + - - - - - - - - - - - - - - -+
                    ' Github.com repositories   '         ' Github Actions               '
                    '                           '         '                              '
+-----+             ' +-----------------------+ '         ' +--------------------------+ '
| mac |  git push   ' |     << Private >>     | '  run    ' | clone my-blog repository | '
|     | ----------> ' |    my-blog-source     | ' ------> ' |                          | '
+-----+             ' +-----------------------+ '         ' +--------------------------+ '
                    '                           '         '   |                          '
                    '                           '         '   |                          '
                    '                           '         '   v                          '
                    '                           '         ' +--------------------------+ '
                    '                           '         ' |        build blog        | '
                    '                           '         ' +--------------------------+ '
                    '                           '         '   |                          '
                    '                           '         '   |                          '
                    '                           '         '   v                          '
                    ' +-----------------------+ '         ' +--------------------------+ '
                    ' |     << Public >>      | '  push   ' |   git commit and push    | '
                    ' |        my-blog        | ' <------ ' |                          | '
                    ' +-----------------------+ '         ' +--------------------------+ '
                    '                           '         '                              '
                    + - - - - - - - - - - - - - +         + - - - - - - - - - - - - - - -+
↑の構成の通り、元ネタMarkdown用のPrivate repositoryへのpushをきっかけに、 「作った記事をGithub Pagesで公開する 」で手動で実施した作業を Github ActionsのWorkflow(以下、Workflow)にやらせれば良いということです。 こう聞くと難しそうに聞こえますが、yamlファイルを1つ用意するだけなので簡単です。
それでは、早速その設定方法を説明します。
Github Pagesリポジトリへ記事をコミットするための公開鍵/秘密鍵を生成する
まず、Workflowで使う公開鍵、秘密鍵を作成します。
# "xxxxx" は自分のメールアドレス
$ ssh-keygen -t rsa -b 4096 -C "xxxxx"
Generating public/private rsa key pair.
Enter file in which to save the key (/Users/user/.ssh/id_rsa): /Users/user/.ssh/id_rsa_for_my-blog
Enter passphrase (empty for no passphrase):
Enter same passphrase again:
Your identification has been saved in /Users/user/.ssh/id_rsa_for_my-blog.
Your public key has been saved in /Users/user/.ssh/id_rsa_for_my-blog.pub.
The key fingerprint is:
SHA256:DVOSO96T6kdRtmlM24YPlwzpn4YeTVz/Q+2lYm8Yws0 xxxxx
The key's randomart image is:
+---[RSA 4096]----+
|        ...  .   |
|        .o  *   .|
|        o. * X oo|
|        o+. X O.+|
|       .S+.* X.+o|
|        . B E B.o|
|         o = B  .|
|        . . o o  |
|       ...   .   |
+----[SHA256]-----+
$
$ ls -al ~/.ssh/id_rsa_for_my-blog*
-rw-------  1 user  staff  3369 10 10 17:59 /Users/user/.ssh/id_rsa_for_my-blog
-rw-r--r--  1 user  staff   731 10 10 17:59 /Users/user/.ssh/id_rsa_for_my-blog.pub
公開鍵と秘密鍵が作れました。
※この秘密鍵はWorkflowで使うためのシークレット変数としてGithubに登録するので、念の為普段自分が使ってる鍵とは別で作成することをおすすめします。
Github Actionsを設定する
公開鍵、秘密鍵が作れたので、Workflowの設定を行います。
まず、ブログ本体のリポジトリ( my-blog )のSettingsタブから Deploy key (公開鍵)を追加します。
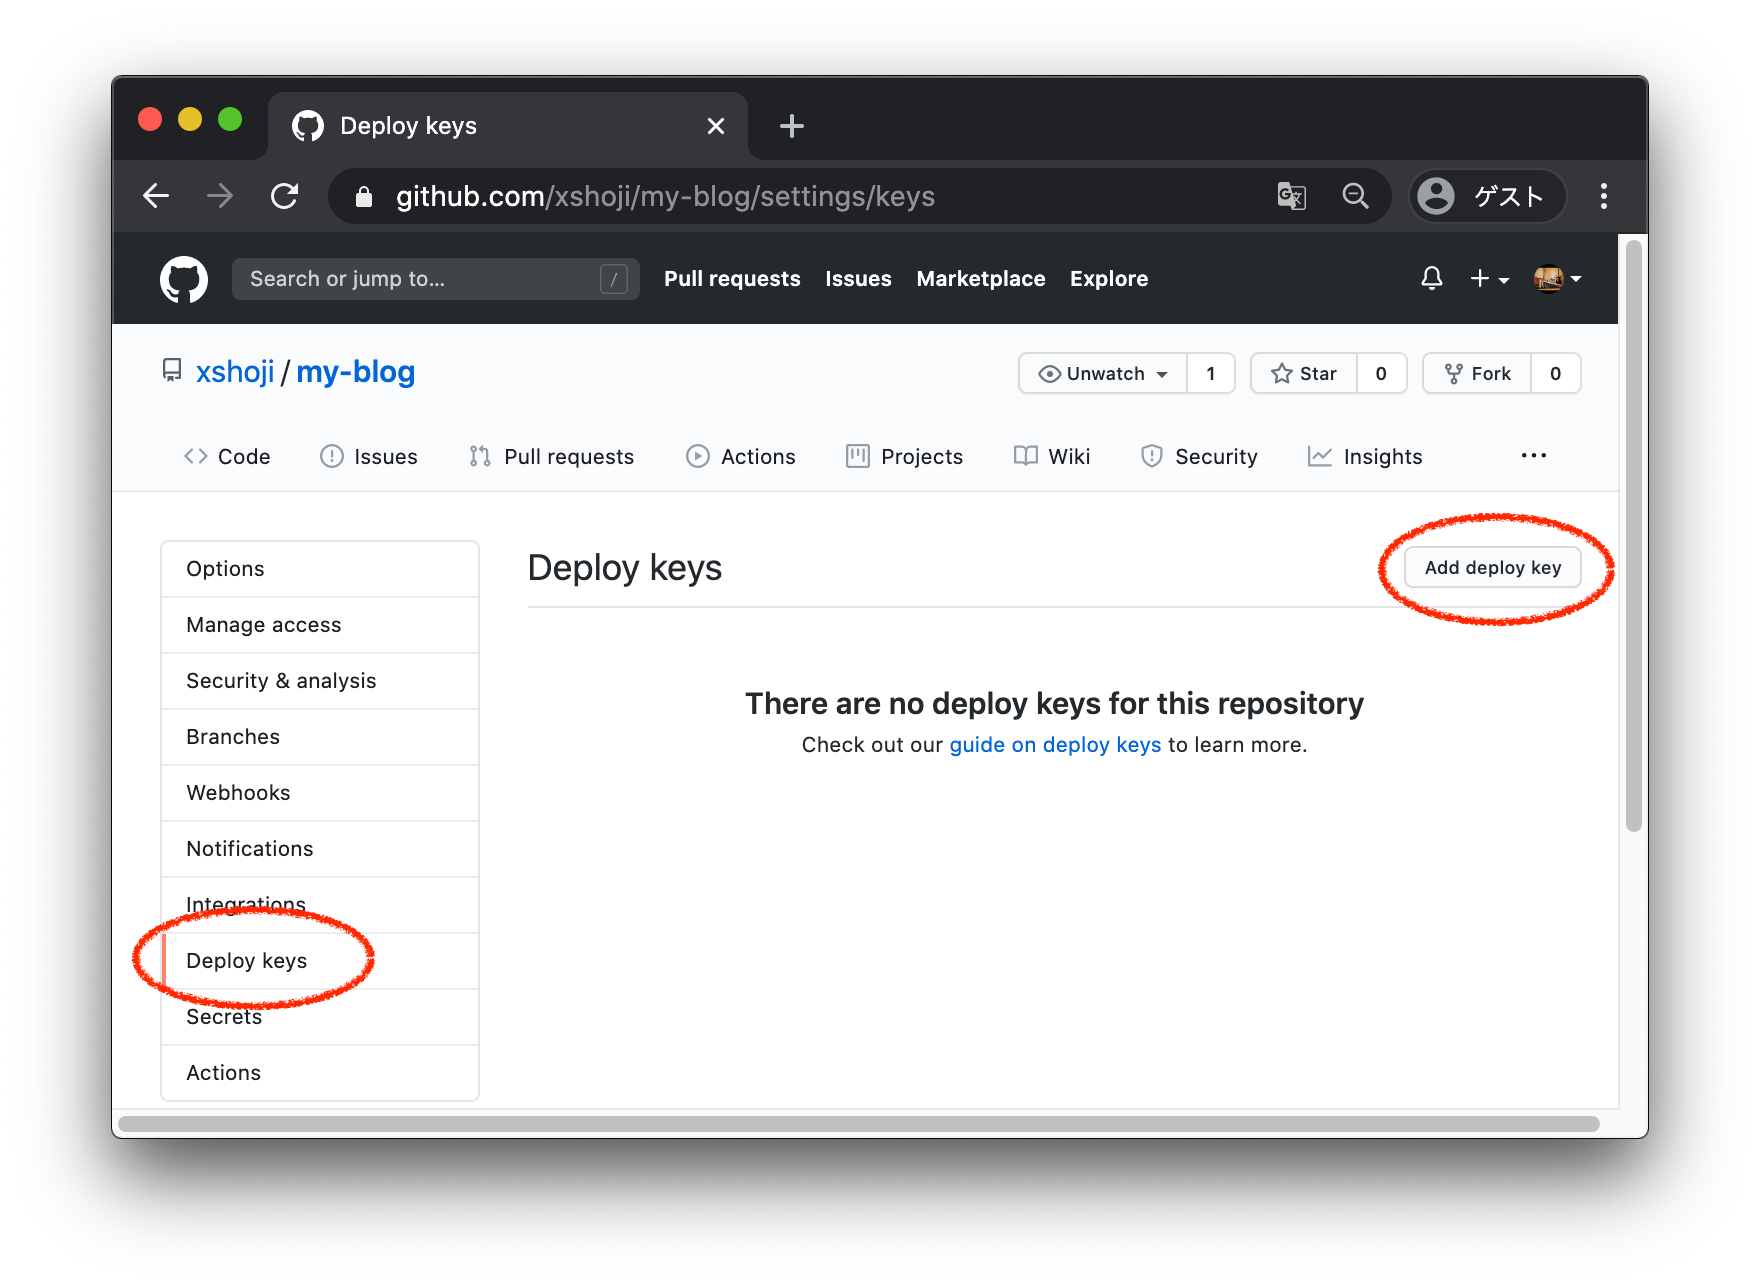
Add Deploy Keyで開いたページで以下の通り設定します。
- Title: blog deploy key(分かりやすい名前なら何でもOK)
- Key: さっき作った公開鍵
/Users/user/.ssh/id_rsa_for_my-blog.pubの中身をコピペ - Allow write access: チェックを入れる
これで、 my-blog 側の設定は完了です。
次に、ブログの元ネタのリポジトリ( my-blog-source )でWorkflowの設定を追加します。
ブログの元ネタのリポジトリのrootに、.github/workflows/release.yml というファイルを作成します(ファイル名はなんでもOK)
$ cd /tmp/my-blog-source/
$ mkdir -p .github/workflows
$ touch .github/workflows/release.yml
$ ls -al .github/workflows/release.yml
-rw-r--r--  1 user  wheel  0 10 10 18:36 .github/workflows/release.yml
で、以下の内容を貼り付けます。
name: release

on:
  push:
    branches:
      - main # ■メインブランチがmasterならmasterに置き換える■

jobs:
  deploy:
    runs-on: ubuntu-18.04
    steps:
      - uses: actions/checkout@v2
        with:
          submodules: recursive  # Fetch Hugo themes
          fetch-depth: 0         # Fetch all history for .GitInfo and .Lastmod

      - name: Setup Hugo
        uses: peaceiris/actions-hugo@v2
        with:
          hugo-version: '0.75.1'

      - name: Setup git for blog repository
        env:
          GIT_SSH_COMMAND: ssh -i ~/deploy_key.pem -o StrictHostKeyChecking=no -F /dev/null
          DEPLOY_KEY: ${{ secrets.DEPLOY_KEY }}
        run: |
          echo "$DEPLOY_KEY" > ~/deploy_key.pem
          chmod 600 ~/deploy_key.pem
          git config --global user.email "action@github.com"
          git config --global user.name "GitHub Action"
          git clone  git@github.com:xshoji/my-blog.git # ■自分のブログ用リポジトリに置き換える■

      - name: Build
        run: |
          cd hugo-source
          hugo --minify --gc --cleanDestinationDir
          cd .. && ls -al

      - name: Deploy
        env:
          GIT_SSH_COMMAND: ssh -i ~/deploy_key.pem -o StrictHostKeyChecking=no -F /dev/null
        run: |
          cd my-blog # ■自分のブログ用リポジトリ名に置き換える■
          git add -A
          if ! git diff --cached --quiet; then
            git commit -m "Updated on $(TZ=Asia/Tokyo date +"%Y-%m-%d %H:%M:%S") (SHA: $GITHUB_SHA) by GitHub Actions"
            git push origin main # ■メインブランチがmasterならmasterに置き換える■
          else
            echo "No differences."
          fi
一応、このWorkflowでやってることをざっと説明すると
- ブログの元ネタのリポジトリ(
my-blog-source)のmainブランチをチェックアウトする - hugoをインストールする
- ブログ本体のリポジトリ(
my-blog)へpushするため秘密鍵を配置する - ブログ本体のリポジトリ(
my-blog)をcloneする - hugoコマンドでブログの元ネタのリポジトリ(
my-blog-source)から静的ファイルを生成する - 生成した静的ファイルをブログ本体のリポジトリ(
my-blog)にcommitしてpushする
をやってます。まさに「作った記事をGithub Pagesで公開する 」で手動でやってた作業ですね。
これで一旦コミット、プッシュしておきましょう。
次に、このWorkflowからブログ本体のリポジトリ( my-blog )へpushするための秘密鍵をSecretに登録します。
ブログの元ネタのリポジトリ( my-blog-source )のSettingsタブのSecretsに秘密鍵を登録します。
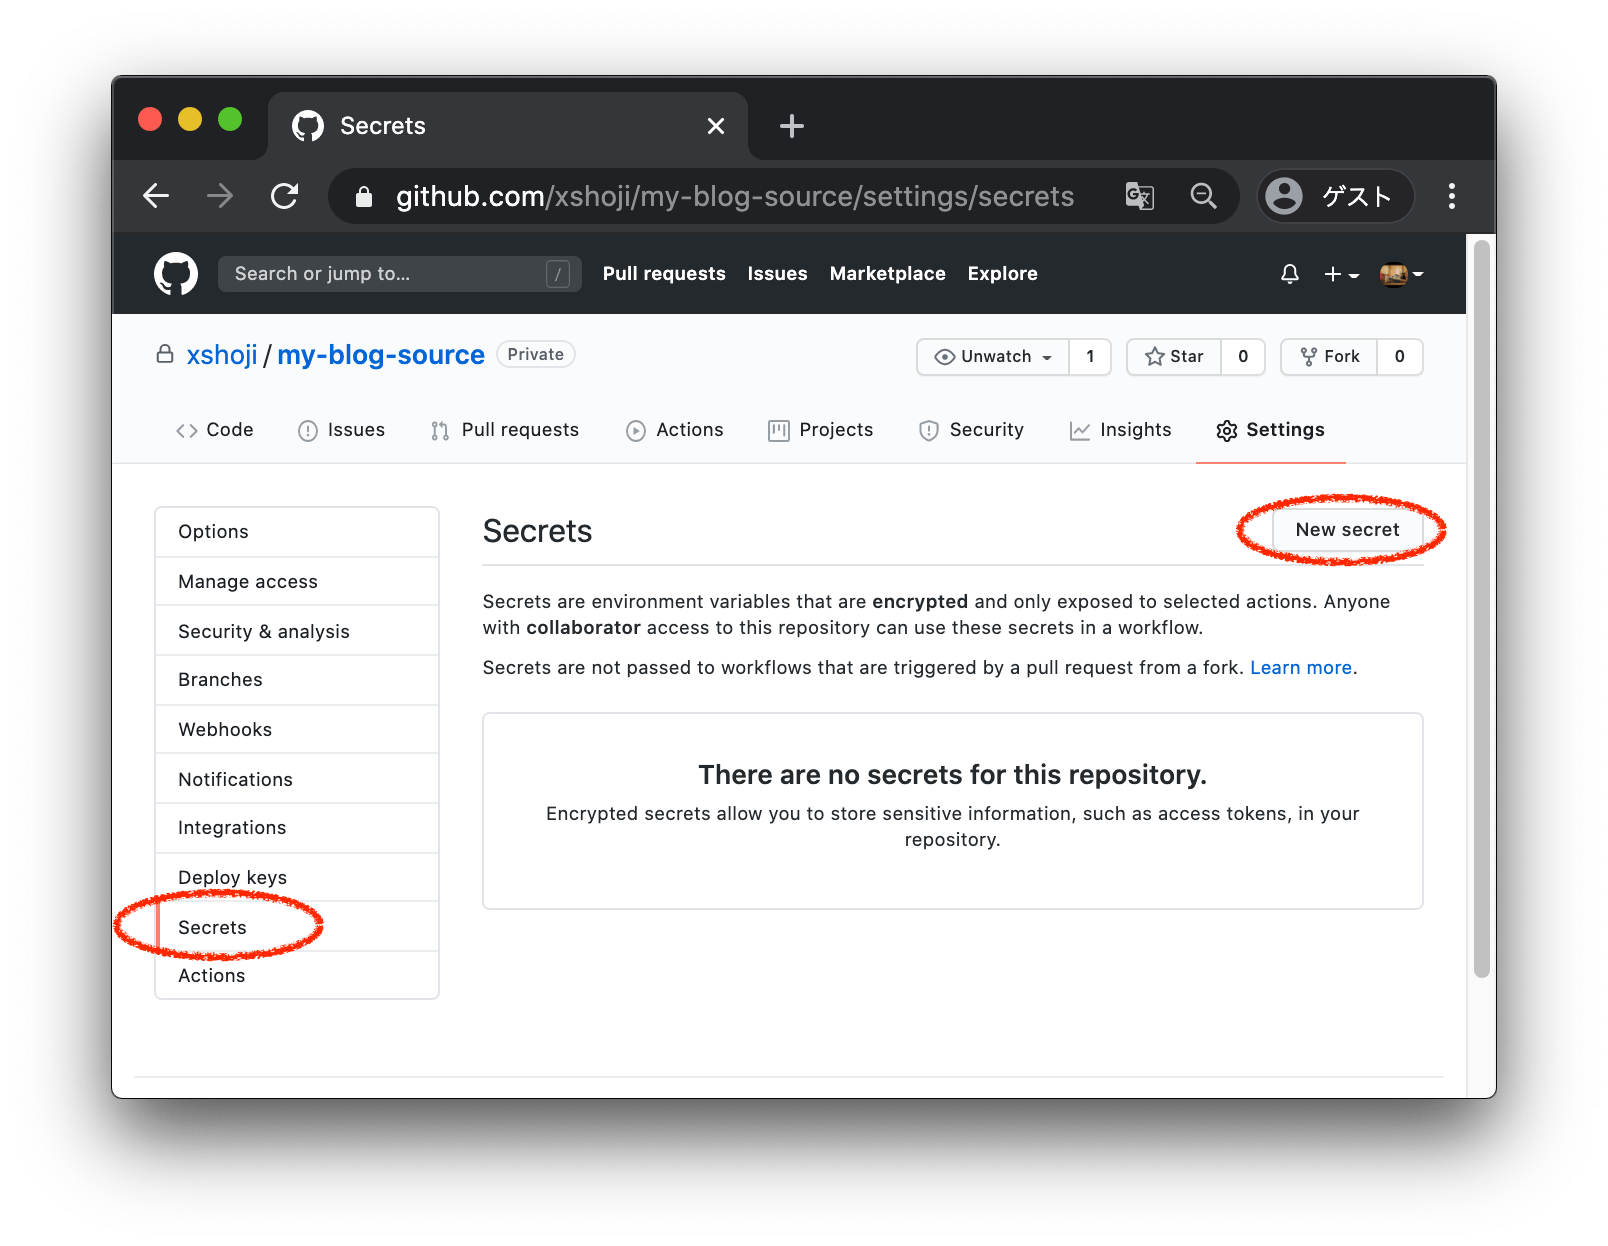
- Name: DEPLOY_KEY <– この値は↑のWorkflowで参照してる変数なのでこのままで
- Value: さっき作った秘密鍵
/Users/user/.ssh/id_rsa_for_my-blogの中身をコピペ
これでOKです。最後に、ブログの元ネタのリポジトリ( my-blog-source )のGithub Actionsを有効化します。
ブログの元ネタのリポジトリのActionsタブに行きます。
Workflows aren’t being run on this repository
Actions are not currently enabled on this repository.[ Enable Actions on this repository ]
こんな画面が出るでEnableを押します。
これで設定完了です。
Github Actionsで記事を更新する
実際にmarkdownの記事を追加して、それを公開してみましょう。
# まずは記事を追加します。
$ cd /tmp/my-blog-source/
$ cd hugo-source/
$ hugo new posts/20201010_second-post.md
# 記事を編集します(draft: falseを忘れずに)
$ vim content/posts/20201010_second-post.md
$ cat content/posts/20201010_second-post.md
---
title: "20201010_second Post"
date: 2020-10-10T19:12:44+09:00
draft: false
---
# This is second post
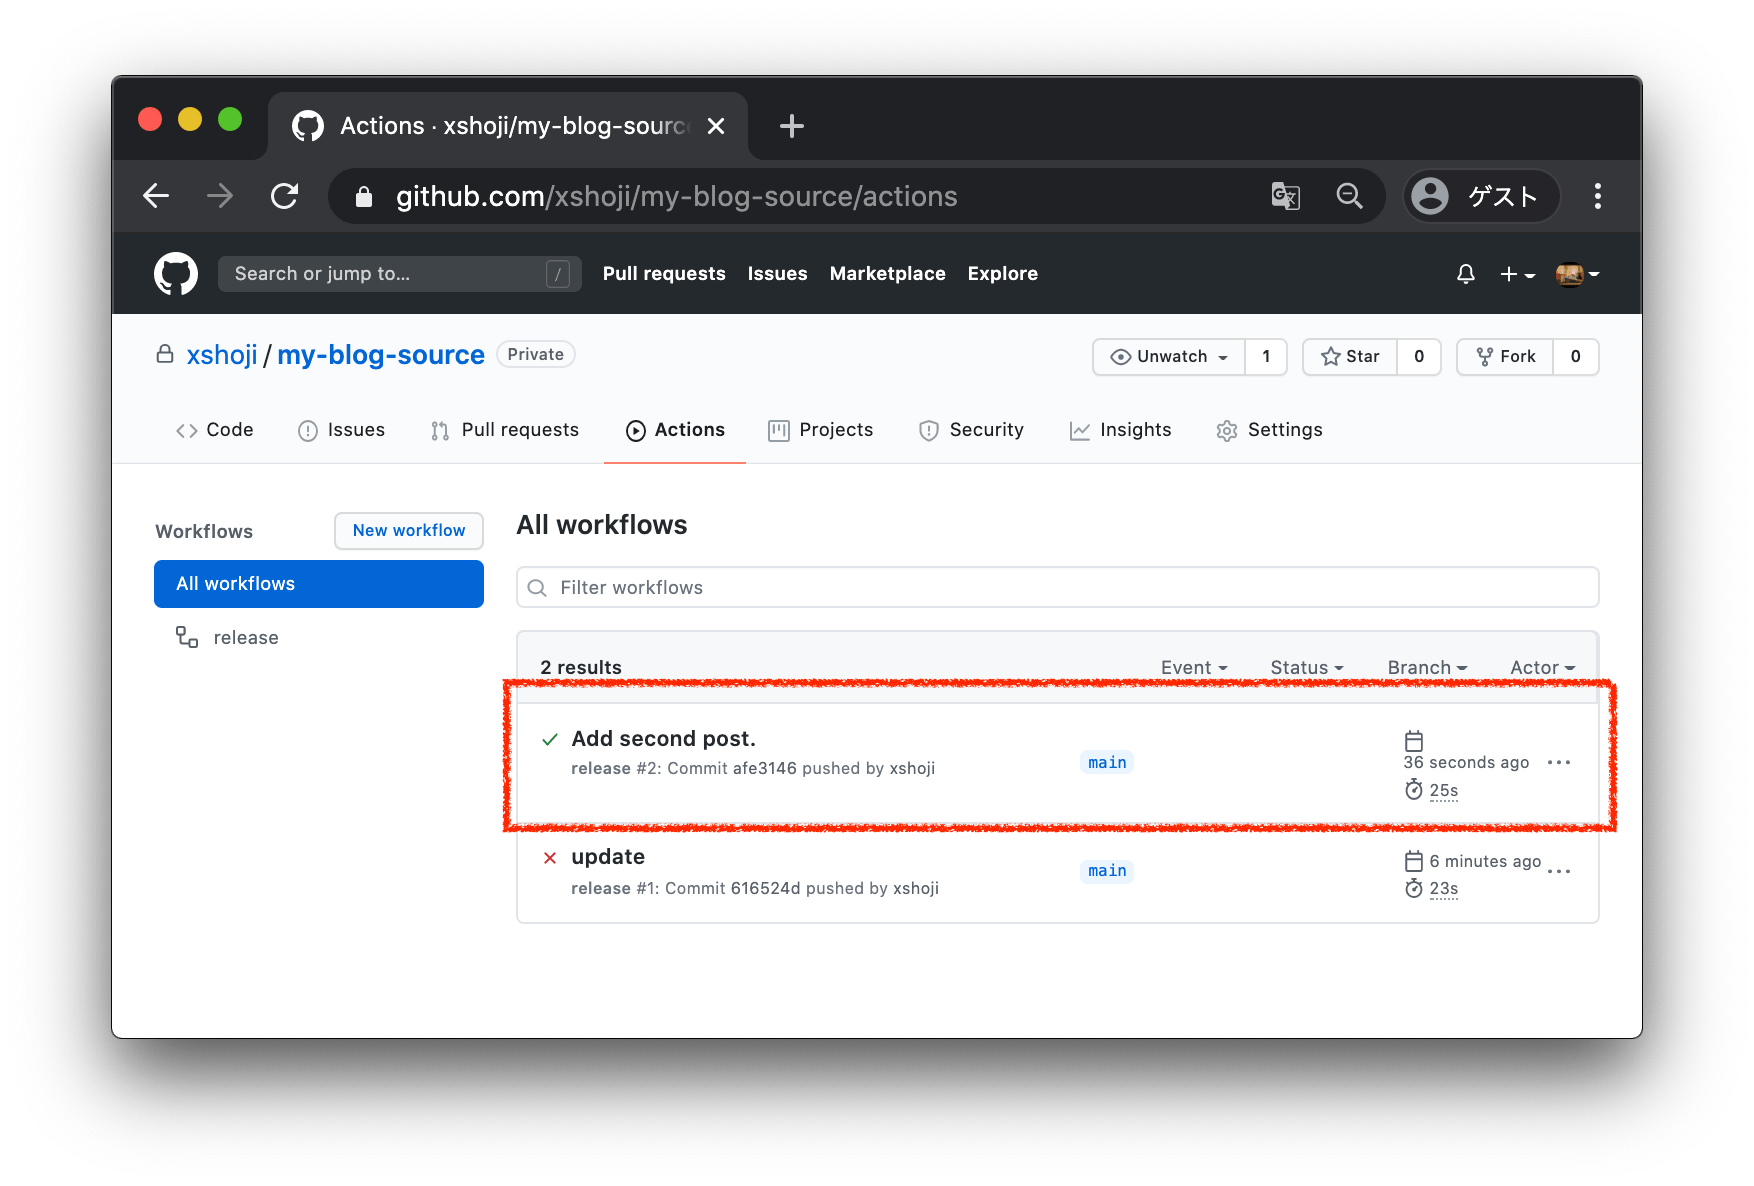
This is second post.記事ができたので、コミット&プッシュしてみましょう。
$ git add . && git commit -am "Add second post."
$ git push
Enumerating objects: 10, done.
Counting objects: 100% (10/10), done.
Delta compression using up to 8 threads
Compressing objects: 100% (5/5), done.
Writing objects: 100% (6/6), 558 bytes | 558.00 KiB/s, done.
Total 6 (delta 2), reused 0 (delta 0), pack-reused 0
remote: Resolving deltas: 100% (2/2), completed with 2 local objects.
To https://github.com/xshoji/my-blog-source
   643f307..43705d4  main -> main
$
Workflowの設定がうまくできていると、以下のようにブログの元ネタのリポジトリ( my-blog-source )のActionsタブのWorkflowの実行結果が✅になります。
これで、↑で追加したmarkdownの記事がhtmlの静的ファイルに変換され、ブログ本体のリポジトリ( my-blog )にそれらのファイル群がcommit, pushされています。
ブログ本体のリポジトリ( my-blog )を見ると、以下のようにactions-userユーザーによってファイルが更新されていることが分かります。
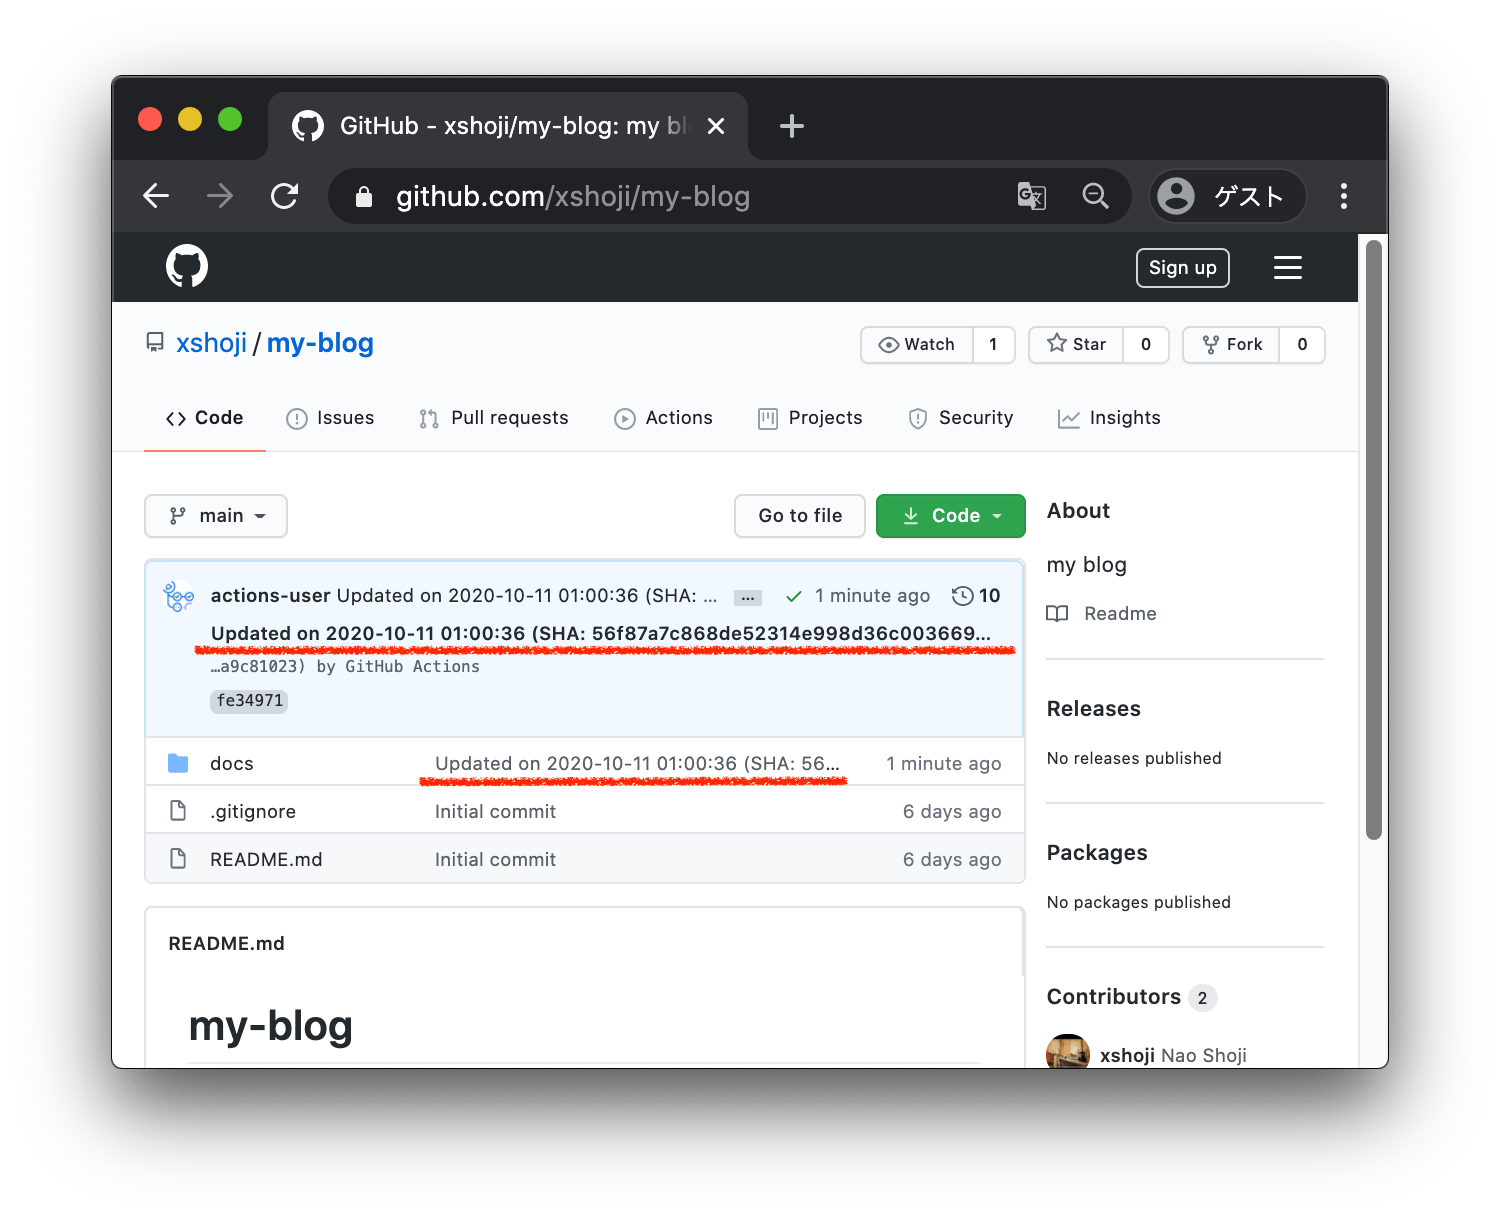
これで記事の更新が自動化できました。
GitHub Pagesを設定して公開する
で公開したGithub pagesのサイトを再び見てみましょう(更新されてますよね?)。
このように、ブログの元ネタのプライベートリポジトリ( my-blog-source )にmarkdownの記事をPushしただけで、Github pagesで公開しているブログが自動で更新されていることが分かります!
以降は、markdownの記事を追加して編集し、出来上がったら draft: false にしてpushするだけでお手軽にブログを更新できます。無料だし、めっちゃ楽です。以上。
参考にさせて頂いたサイト
GitHub Actions による GitHub Pages への自動デプロイ - Qiita
https://qiita.com/peaceiris/items/d401f2e5724fdcb0759d
peaceiris/actions-hugo: GitHub Actions for Hugo ⚡️ Setup Hugo quickly and build your site fast. Hugo extended, Hugo Modules, Linux (Ubuntu), macOS, and Windows are supported.
https://github.com/peaceiris/actions-hugo
GitHubのSecretsを活用して、GitHub Actionsで安全に機密情報を扱う - Qiita
https://qiita.com/developer-kikikaikai/items/60b209c065f076dca7a1
GitHub Actions で別のリポジトリに git push する
https://3nan3.github.io/post/2019122201_github_actions/
逆引きUNIXコマンド/指定したタイムゾーンのローカルタイムを表示する方法・TZ - Linuxと過ごす
https://linux.just4fun.biz/?%E9%80%86%E5%BC%95%E3%81%8DUNIX%E3%82%B3%E3%83%9E%E3%83%B3%E3%83%89/%E6%8C%87%E5%AE%9A%E3%81%97%E3%81%9F%E3%82%BF%E3%82%A4%E3%83%A0%E3%82%BE%E3%83%BC%E3%83%B3%E3%81%AE%E3%83%AD%E3%83%BC%E3%82%AB%E3%83%AB%E3%82%BF%E3%82%A4%E3%83%A0%E3%82%92%E8%A1%A8%E7%A4%BA%E3%81%99%E3%82%8B%E6%96%B9%E6%B3%95%E3%83%BBTZ